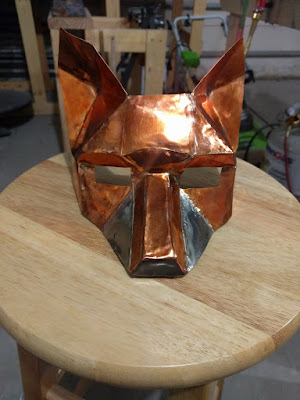
I've had the idea of making a metal fox mask for a few years now, but haven't really had a reason to do it until this year. Work decided our holiday party would be a murder mystery masquerade, which makes a great excuse.
The basis for the mask was Wintercroft's Fox Half Mask. The half mask is perfect for the masquerade use, and I thought the papercraft/low poly look would translate well to the metal.
I took the mask template and glued it to 22 gauge copper sheet with spray adhesive.
Then after about an hour of work with a jeweler's saw...
I had the pieces, somewhat resembling a fox mask, but mostly a Batman logo.
The paper templates were attached to the other side, so I could use the dotted lines for initial bends. These were mostly done on the corner of an anvil or over a piece of 1"x4" clamped in a bench vice. A rubber mallet was used instead of a metal hammer, since the rubber won't leave indentions in the surface where the hammer strikes.
After the initial bends and a few solder joints to keep things somewhat together, the mask was starting to look either like a fox or a gremlin idol.
After a lot more hammering, soldering, and making things line up, the mask was mostly together. At this point, I cut out the two panels on the sides of the muzzle so I could solder in sheets of nickel silver for a white highlight in the finished mask.
Following the same trend, cutting out the sides made it start reminding me of Batman again. Bat eared fox man.
While soldering in the nickel silver sheets, I occasionally switched back over to a metal ball-peen hammer to close up the joints. By hammering on either side of a narrow gap, you can push the metal together to form a proper seam for the solder to flow.
Finally, I added two bronze wire bars on the inside as anchors for the straps.
With those in, all the soldering was complete. So, the mask took an extra long soak in the pickle to eat away all the flux and oxidation, then got one more pass over the anvil and board with the rubber mallet to re-set the edges and work harden the copper so it wasn't so ridiculously bendable.
At this point, there was a lot of solder to clean up since I was a pretty sloppy. (I haven't done jewelry soldering since college.) I also wanted to file down the seams so they weren't so obvious.
I'm going to skip the boring details here, but a lot of filing, sanding, and polishing later, we get a super shiny mask.
The last thing to do in the shop is to oxidize the copper to it goes from the clean pinkish color to the orange I want for the mask. I took a propane torch and very lightly heated the metal. The flame never actually touched the metal and was always moving so it would go slowly. If the metal heats up too much, you start getting other colors like this:
Those colors are caused by the thin layer of oxides on the surface refracting the light. As you heat the metal more, the layer gets thicker, and the colors change. At least for this, so long as it doesn't get hot enough to turn the area a greyish-white, it works just fine. This is because when we put a finish on it (Johnson's paste was is what I use), it changes the thickness of the layer, so the refraction no longer comes out the same and it just looks the base orange.
I didn't take a direct picture, but the front panel of the muzzle also got a layer of Rio's brown/black patina applied to make a nose.
After applying the wax and buffing it all out, we get the finished mask. (It needs a strap still, but that part is not particularly interesting.)


